Friday 29 May 2015

Tiger Tank Cupola Update

Hi all,

Though I would give you a update on how I have been progressing on my Tiger Tank. With this week being bank holiday Monday in the UK (Over which I went to a music festival Dot to Dot Nottingham and saw lots of great bands such as Amber Run and Saint Raymond) I've only managed to fit in a little bit of modelling but now the Cupola is really starting to take form with those extra detail that really polish a model. .

This week I looked at modelling the hinge system that connects the hatch to the drum cupola. The hinge works on a 3 piece system with 2 hinges and a link to help close the lid on this great beast. The main Hinge seats underneath what looks like a spring system that would help the commander lift the hatch of his cupola. as the lid was 15mm thick it mush have been fairly heavy. The hatch diameter was 420mm lined with a thick rubber seal to prevent water form entering in deep wading and heavy weather conditions.


Tiger Drum Cupola

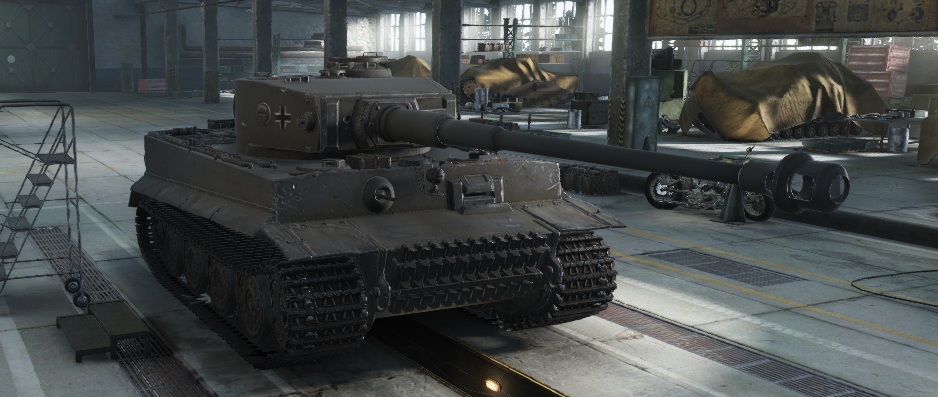
The hinge in itself seemed pretty complex for its purpose but the Tiger in general was notorious for being ridiculously over engineered. In WW2 to consider which nation had the least fuel and metal to come up with an idea for a fuel munching metal beast like the Tiger tank was almost insane. 


Hinge Technical Drawings

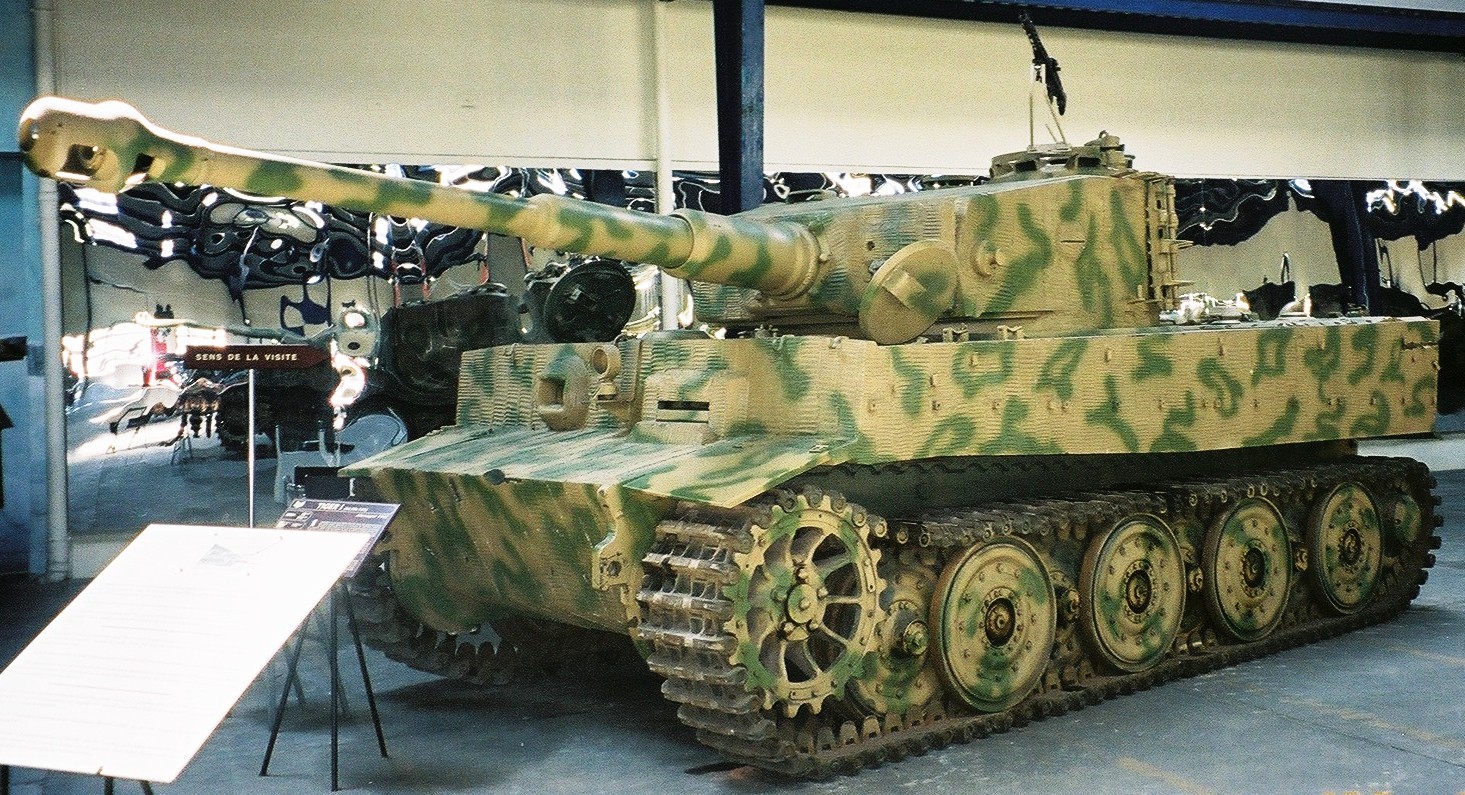
Above is the technical drawings of the commanders hatch lid hinge. I noticed that the fall off curvature from the hinge wasn't quite right in comparison to what is shown from Pictures taken of Tiger 131 in the Bovington Tank Museum. I altered my model whilst using the measurements given to more accurately depict the hinge.


Hinge Wireframe


Hinge Turbo Smoothed

The eyelet that connects the two Hinges looks almost like a bike chain with a little extra to help the lid rest in a stable position when opened.


Eyelet Link technical Drawing


Wireframe of Link


Turbo Smoothed Link

The final bit of the hinge is now the bit that is connected to the drum itself. its more or less the mirror of the first  hinge I made but with a few different features.


Second Hinge Technical Drawing


Wireframe of Second Hinge


Turbo Smoothed Second Hinge

So the top of the Cupola is starting to take shape now, I have a few more things to do then I can add the 18 degree offset to the top details. Its just easier to keep things this way until the end as any 3D person will know.


Progress So Far =)


What the Top of the Cupola Will Look like with the 18 Degee Offset


That's all for this week, I hope to catch you back here soon. Till then take care and have fun playing what every you play. Before I go I would like to thank the Tiger website I have been using for all your technical drawings. You have been a great resource. Find the link to it here

Wednesday 27 May 2015

The Gremyashchy Destroyer, the Steel Fishy Russian No One Wants to Sit next to.

Welcome back all.

I would like to take a little bit of time to thank everyone that comes here every week. its been a little harrowing to see the amount of traffic coming through my Blog. Sentimentality aside this week I will be reviewing the Gremyashchy (its just as well you only have to read this than hear me say it as I have no idea how to pronounce the name), the Project 7 Destroyer 'Thunderous'.


The Gnevny Class Destroyers were the product of five year plan for the Soviets in the 1930's to restarts construction of their naval fleet. The design was a collaboration between the Soviet Russia and Fascist Italy to make a line of Destroyers similar to the line that currently served in the Greek and Turkish Navies.

30 Destroyers were built out of the total 36 ordered before a major structural weakness was found in the ships infrastructure which resulted in the Destroyers having limited the sea worthiness. In pure Russian fashion despite these grave structural errors the ships were already paid for so they went straight into service rather than go to waste. This was to prove fatal killing 35 sailors when the stern of the Sokrushitelny (another Project 7 Destroyer ironically Destructive in Russian) simply broke off in heavy weather conditions in November 22nd 1942.


For those of you waiting for the closed beta to move into open beta and are simply bursting to get into World of Warships, the purchase of this ship earns you a one way ticket into the closed beta. In terms of a purchase this is a good one. you can definitely do worst then this ship. I am not the best destroyer captain as I play a lot of Battleships. the play styles are very different and I tend to use my destroyer like at battleship.

The Gremyashchy lends to the longer range Battleship style of play more than the american line of destroyers that I have explored so far. Americans need to get close and personal where the Russian Gremyashchy excels in long range mixed with stealthy combat.

The range of the Torpedoes enables you to get within 8 km drop its metal fish in the water and retreat without being detected. The Gremyashchy is pretty quick at about 38 knots for a tier 5 destroyer. Its pretty nimble on its feet too having a complete rudder shift time of 3 seconds helping to dodge the inevitable rain of fire you will experience. The Torpedoes while not being as quick as Japanese ones have a very good range which works with the long range style of play this destroyer seems to fall into. This long range style of play is further enforced with the very slow turning speed of the turrets. This is no american destroyer with fast turning turrets meaning close range brawls tends to leave a nasty taste in the mouth whilst they run rings around you whilst you struggle to bare your guns on him.

Playing a destroyer is quite like driving light tanks in World of Tanks where mistakes rarely leave you alive but there is nothing quite like dropping torpedoes and watch their almost innocent splash run towards the enemy ships and hit for tremendous damage.


The Mighty Jingles with yet another Ship Video
(I will get round to doing a ship he hasn't reviewed soon)

The guns on this destroyer do pack a decent punch so harassing other ships that are distracted is really this ships strong suit. The surface detectability of this ship is 7 km so enables you to be sneaky, race up to the enemy, unload at your own leisure and run away in a puff of smoke.

I do like this destroyer even if I'm not great at captaining that class in general. There is a certain amount of excitement that comes with destroyers that is wildly addictive and it keeps you coming back for more. With the added bonus that this grants access to the closed beta its a prime buy players that prefer stealthy play. The USS Sims plays very differently to the Gremyashchy so really is goes on your style of play you normally fall into as these are two fantastic destroyers. I would say that the Gremyashchy is more nooby friendly as it is a lower teir and you wont need to close to deadly close ranges. Experience is needed to stay undetected and launch ambush attacks and this ship enables you to get less threatening distances before being effective. They are both great fun so which ever you choose you wont be disappointed.

That's all for this post. Catch you later in the week for another post.

Wednesday 20 May 2015

World of Tanks HD Models

Welcome back,

A quick post for this week's 2nd post, but very much a pretty eye candy filled one. I thought I would shake things up a bit this week and post about the up and coming update for World of Tanks 9.8 patch.

Anyone that has been following this blog from way back when will know I play World of Tanks (WoT) casually (mosty casually because I am a very average player). I follow the up and coming updates from Wargaming Net forums/website, you tube channels like Mighty Jingles , Quickybaby, and Sir Havok. I also have a massive infatuation with tanks and mechanical things in general were/are war related. Running with that ethos I would like to share some massive HD model eye candy that will be coming up in the 9.8 release and also the new game mode that is currently being worked on by the WoT team


You have to appreciate the amount of hard work Wargaming is putting in (plus external companies they are being outsourced) to get this game competitive with other tank game titles. Its fresh to see that the competition has started them on the line to upping the over all visual standard for WoT.

All of these models are created using PBR textures. Substance painter works with creating PBR textures and is a great program for any aspiring 3D artist to have in his arsenal of tools. If you don't know what that is or are interested, look at my previous posts about Substance Painter which covers what its and also what it is capable of. I have a lot of work left to do in Substance Designer (another program that works alongside painter) training myself to create different substances for metals before I have a crack at creating anything like this.

These models you see here a good standard for me to aim for if not surpass with my current Tiger Model I am working on. I will try to keep you guys updated as I work through it on the processes I am thinking of doing/thinking about to help you understand my work flow a bit more.

Now for the new game mode. The Youtube celebrity QuickyBaby(https://www.youtube.com/user/QuickyBabyTV/featured). He gives a nice review from his experiences of the new game mode that is set to hit 9.8 buy showing you some actual game play and commentary. This new Domination mode features the implementation of a new respawn feature, repair zones and capture the flag style play all rolled into one. In my opinion will be a exciting new addition to the WoT world giving a nice shift to style of play. It will be interesting to see how this new mode progresses and if it is incorporated into E Sports. Only time will tell but for the mean time I hope you enjoy this Quickybaby break down.


See you here again for my next post soon.

Monday 18 May 2015

Tiger Tank, The Drum Cupola

Hi all,

I did plan to get this post out over the weekend but as things fate conspired against me (i.e. a USB stick had a untimely death when going back to a family event) so I will get this post out as part of my first double post this week. This is just a quick update on How I have been getting on with my Tiger tank and a little sneak preview of my working process.

After doing a bit of searching about the look of the Tigers there are 2 distinct types of cupola. The earlier drum cupola mounted in earlier versions gave the commander a higher point of view when viewing the battle field but left his head quite exposed. For those of you that play world of tanks you will be used to seeing the later style turret on the Tiger though I'm not quite sure where the first turret that tiger uses comes from as I have seen no imagery of that style of turret been fitted to a tiger (anyone fancy giving a comment on that would be interesting)


The asymmetric turret everyone recognises with the Tiger Tank 


What is this turret? Stock turret in WoT but when was this used?

When most of the tank from the front had 100mm of armour, which on a ideal engagement would be facing the enemy at a 45 degree angle, made the effective armour around 140mm ish thick (without the proper maths done). A direct shot to the commanders cupola assuming the shot hits on a dime, is only 75mm. Though hitting a drum design exactly at perpendicular angle is pretty hard to go when engagements for tigers were mostly at long range.


Older Drum Design Cupola

Later Tigers incorporated a flatter design which was adopted onto the kind tiger and a similar variety onto the Panther. This cupola design saved on materials needed to build it as well as reduced the vulnerability of the commanders head to fire.


Later variant of Tiger shown by the later varient of cupola, road wheels and gun mantlet

Building the Tigers early cupola really highlights how complex the tank was in comparison to Russian and American tanks. Designed for deep wading up to 4 meters the tank had to have drainage holes cur into areas which water would collate. The 10 round holes cut into he top of the cupola allowed water to drain off from the cupola lid whilst having a 18 degrees offset so the water did not run off directly into the vision slits lower down (very early editions of this cupola had drainage holes above the view ports before this error was noted). 

The thickness of the armour variates throughout the drums total structure but on the whole it maintained a 75mm thickness along the main body that covered the commanders head.


Cut through of thickness for tigers Drum Cupola

The Diameter slightly as well as shown in the image below.


Diameter of different parts of the Cupola

All these reference images for sizes and positions are from www.Tiger1.info  which has been a amazing site for technical information throughout this project so far so I can't recommend it enough.

Doing 3D meshes with cuts in always presents a challenge of how best to position your geometry to best get what you are trying to achieve whilst keeping your mesh tidy. This is again harder in cylinders as securing lines in the wrong areas cause pinching. Without creating my own tutorial which would be pointless there is loads of tutorials out there on youtube and this in particular tutorial shows exactly how I structure my geometry when I created my Cupola.


I went one step further than this guy however by figuring out the maths about where I could place my cuts along the Circumference of the cylinder to get the geometry to seat in the exact positions I wanted them too. In short I figured out the circumference, (because I knew the Diameter I could figure out the circumference which is C=πd) then set out cylinders with the exact lengths (for the view port slits in the cupola) and diameter (for the drainage holes) then bent the boolean'd mesh around a central point to create a cylinder. This may be hard to visualise in your head so ill put some pictures below.


Doing this method should in theory place the cuts from the boolean in the exact place they should be if its a perfect circle.

After a little bit more work that what I have shown you here this is where I am with the Cupola. I still have more work to go with it like creating the welds for where it connects to the turret and the hinge to model but I'm fairly pleased with the result. The cylinder still has a little bit of pinching but its pretty negligible 

The Un-Subdivided Wireframe Mesh


The Smoothed Mesh (turbo smoothed)


Smoothed Non Wireframe Result WIP

This is where I am so far, working full time means little time for me to do my own work but its important that I keep it up share and review it for my own self progression. Thats all for now, I hope you've enjoyed this little snippet of my work and keep looking back as I battle my way through this bad boy to create a banging looking Tiger tank. 

Wednesday 13 May 2015

The Yubari, the Aircraft Prevention Package.

Hi all again and thanks for all your continued interest in my blog.

Just a quick heads up I am thinking of increasing my blog posts to 2 per week but obviously this will increase the amount of commitment for me to post here. I may try a couple of trial runs getting 2 posts up here and see how it goes. I would like to focus a bit more on my 3D as I seem to be posting more about games that I am playing (mainly World of Warships lately, but I will try and incorporate World of Tanks and War Thunder plus a few more when I go through my game rotation). This was originally what I set my blog up for (self reflection and interesting things 3D related). Stay posted if that's what you look here for as I will be being a bit more pro active with my modelling at home. Ironical I am doing another Premium ship review this week on the Imperial Japanese Yubari Class Cruiser but I will try and give you a update on my Tiger Tank progress. Don't be alarmed if its games that you look at my blog as I will be continuing with that too (but hey it may even give gamers a idea of how much work goes into the creation of games if you watch my 3D stuff here too =D)


So the Yubari, what can I tell you about this ship. The Yubari begain its life as a experiemental light cruiser in 1917. Its development was to counter the problem the Imperial Japanese Navy was having following the signing of the Washington Naval Treaty restricting the total fleet displacement to 300,000 tons. The Design philosophy for the Yubari was to improve on existing designs giving a light cruiser the battle potential of a 5000 ton cruiser.  In the design stages and the use of unproven designs lead to some design flaws that were later ironed out later when the Yubari was called back for repairs or refits.


Upon the Ships completion the Ship had a 4190 ton displacement, 13% over its original design specification. The ship featured a curved stem that integrated multiple smoke stacks into one. This resulted in reducing the amount of material needed saving on deck space needed other architecture and weaponry.To also save on weight of the ship the belt armour was incorporated into the hull of the ship drastically reducing the displacement whilst maintaining the overall protection of the ship.


Yet another Mighty Jingles Review of the Yubari Cruiser

The Yubari was the only ship of its kind made and was considered a successful concept, future cruiser adopted some of the ambitious design choices of the Yubari. The ship went through a few improvements to make up for the original design mistakes such as enlarging the smoke stacks  by 1.8 meters to improve the draw of exhaust fumes and providing additional ballast to aid with extra stability. 

After its final refit in 1944 its armament had been significantly upgraded with the focus of adding as many AA guns to its upper structure. This was mainly due to its previous conflicts proved their was a need for them. In March 1942 where the Yubari was attacked by 2 SBD-3 dive bombers and 4 F4F-3 Wildcats killing a few of her crew. The following morning the Yubari was again attacked by SBD-3's where this attack caused fires near to the torpedo launchers. In a serious design flaw, the length of the fire hoses were too short, leading to the crew having to manually jettison the torpedo launcher to avoid them exploding. Depite the damage taken in the attack, the Yubari evaded over 65 bombs and up to 12 torpedoes. The Yubari's plight was not quite done there as 4 B17's attacked her whilst returning to harbour. This attack left three gaping holes in her stern from near bomb misses. Strong anti air needed? I think so!


The Yubari in World of Warships this is a premium cruiser on sale for £14.41 singularly or as a pack for £36.04 as a part of a 3 ship pack. These purchases grant you access to the closed beta test so if you don't have access to WoW closed beta and are interested in the game. I would highly recommend purchasing any of the premium ship in this 3 ship pack as they are all fun and exciting to play (such is the life/play time of a destroyer captain).

In game the Yubari has a main battery of 2 turrets with double 140mm guns and one 120mm Secondary gun. The 120mm secondary is a dual purpose gun that acts as both anti air and anti ship defence. Where the Yubari really shines is in its anti air. It has the best anti air in the whole of the tier 4 and arguably tier 5 ships which makes it a real power house of a support ship for battleships (such as the myogi which has zip) and carriers. This ship would be one of the only ships that you hope that there is a massive number of carriers on the enemy team. I find myself actively powering towards incoming planes and getting at least 3 air kills with this ship before payloads are dropped, mopping up the remainder as they run away with their petty lives. The majority of the ships AA armament is self defense but intelligent play can have you seated close to priority targets for carriers to get effective fire in or in the line of travel of incoming planes.


The Yubari is a good light cruiser but like all ships it has its draw backs. The guns are effective against destroyers and cruisers but really struggle when facing thick armored targets such as battleships. Having 2 turrets with your main armament of 4 guns means having 1 turret knocked out reduces your fire power by 50%. The Kuma and the Pheonix by comparison have more turrets and armament on their decks so generally in a gunnery duel you will have the disadvantage there.  Being a light cruiser the Yubari wont withstand sustained fire for long having the lowest health pool of 18.5k hp but some of that health loss can be negated using the agility of this ship by dodging fire.

The Yubari is a decent ship to captain with its good maneuverable which help make up for the Ships terrible torpedo firing arch. Turning to fire the torp's however generally leaves you having to expose a big section of your ship to fire so I tend to use these more of a secondary engagement option. When captaining the ship regardless of how good the jap's torps are in comparison to other nations its just better in this ship to use as a surprise attack. Using the guns is far more effective in combat with a decent range of 12.8 km (over its equivalent tier Kumas 11.6 km and Phoenix's 12.5km) .


The turning circle of the Yubari is 690m considerably less than its equivalent tier cruisers.You will probably find the Yubari behaves pretty much like a heavy destroyer which enables you to get aggressive with your movements and dodging fire. When facing off against carriers when closing the distance, this maneuverability really helps evade incoming torpedoes too.

In summary for this ship you will need to really pay attention to your teams actions during a fight as you will mainly play a support role. Use your maneuverability to your advantage as dodging incoming fire and torpedoes will keep you alive. This ship doesnt like being the subject of sustained fire so be careful with your engagements and use you strong AA fire to aid in the defence of your fleet. You will have a surface detect ability range similar to a heavy destroyer so surprise attacks with torpedoes around head land and hit and gun attacks with your guns will be your friend.

Thats all for today. Till next time.


Thursday 7 May 2015

HMS Warspite, that gruff old lady you can't quite get rid of.

This week I'll be looking at the new premium ship the HMS Warspite of the Royal Navy. This ship has a long history of combat seeing more combat honors of any other ship ever in the Royal Navy, participating in as many as 15 separate combat scenarios (7 of which were major engagements in the World Wars). The HMS Warspite was commissioned in 1912 as a part of the Queen Elizabeth class Super Dreadnoughts in response to the rumored development of German battleships sporting 14 inch guns.


At the time of her designing Germany and the United Kingdom were having a naval race which increase tensions between the two nations in the lead up to World War 1. On the date of her official intoduction into Royal Navy the HSM Warspite was arguably one of the most powerful ship to exist to date. 

HSM Warspite resilience was legendary being able to take punishment in large quantities. This was proved in the Battle of Jutland (1916) and in Crete (1941) where Warspite took huge amounts of damage and was able to return in a repairable state. Her reputation of the Warspite earned her the nickname 'Grand Old Lady' from her crew and with her 15 inch guns and feared reputation on the seas. HMS Warspite holds the one of the longest known hits in a gunnery duel from a moving ship to a moving target, smacking the Italian ship Giulio Cesar at a range of 24km in the battle of Calabria in 1940.


After 2 refits in her service in the Royal Navy she was a considerable force on the open seas with 14 inch belt armor and bristling with guns and improved engines modernising her for current state of sea faring battles. In World of Warships introduction of the 'Grand Old Lady' I hoped that Wargaming had done a good job in introducing their first British Royal Navy Ship into the game.

The entrance of the HMS Warspite has caused quite a bit of talk on the forums in World of Warships when first people looked at the stats, this prominently comes down to the gun armament rotation speed and range of the 15 inch guns. 


Another Mighty Jingles Video on the Grand Old Lady

All is not lost however as for a battleship the Warspite has a 14km visual spotting distance which is very good for a Battleship, that's pretty much cruiser styles spotting distances. The turning circle is incredible enabling you to be aggressive with your evasive maneuvers. This agile movements and the combination of the thick hide makes the Warspite fun to captain whilst being able to output the damage with you big ass guns. I find that I can consistently do decent damage with this ship having good shot dispersion in comparison to the Imperial Japanese fleets Battleships and large caliber of gun for its teir.

I mentioned that the turret range and rotation speed were pretty terrible and to be fair for battleship... it is pretty terrible. 50-60 seconds to rotate the turrets 180 degrees is down heatedly bad to say the least and combined with its shell range of just over 16km I can see why when people are looking at the stats of the Fuso and the Warspite are just shoving their noses up and raging.  

I feel that people are really overlooking the advantages of this British  Legend of a battleship. This ship was designed to take a beating and dish a proverbial crap ton back and you will have to come to terms with taking damage whilst being clever in your engagements. Getting into gun range to deal damage in the initial stages of the game is important but there is no use powering into the fleet of enemy ships and getting focused down. This Battleship is really meant for the experienced player who can read the flow of the battle and use the accuracy of the big guns to deal consistent high damage to your foes. Once within range of other battleship they are committed to engage you due to Warspite matching most of the equivalent Battleships speeds.


Citadel Hits don't really happen that often with the Warspite. The citadel seems to be sunk bellow the waterline and the kind of engagements you are likely to have will be at a range where the shell trajectory will be too shallow to penetrate to lower vital areas that will cause massive damage. The massive torpedo bulges ensure a massive reduction of damage when torpedoes find their mark. The secondary armament of this ship is deadly to light ships unwary of the massive bulk of this ship powering up to them and can surprise many with their damage output.

In summary for this ship I feel there is a certain amount of experience needed to really benefit from this ship. Looking past its short comings and looking at its advantages really helps you to focus on how to play this ship more effectively. Using this ship you will really notice the turning speed and how you can use it evasively and also to make up for the really bad turret traverse. You can respond to threats effectively with this maneuverability and if not know that your thick 330 mm armor  can weather the storm. It's taken me some time to get used to and love the Warspite even if I was initially disappointed. I do fear this ship will suffer the same fate as the Lowe tank in World of Tanks where people playing for a few hours buy this ship and really suck at it because its geared towards the experienced/intelligent player.