Friday 31 July 2015

Tiger Tank Front Plates

Hi all and welcome back for my late week tiger update.

This week I have been working on the front plates of the Tigers Turret. 100 mm thick, these were essential for the structural integrity of the tigers turret, closing the horse shoe shape with one bar at the top and one at the bottom. These frontal cross bars provided the vital supports for its deadly 88 gun, giving both the sealing frame & gun mantlet points to attach too.


My progress this week have been hampered by little or no imagery/reference to go from. I am still not happy with this as I this is really a work in progress at the moment. I will probably go back and change this once I have a little more reference photos.


This pictures below show where I currently am with the frontal plates. It's been hard to know what's going on with the bars where they intersect the cheeks of the turret. This due to the welds in photograph references but I've had a good crack at it.


I have also made a start on the truncheons on the turret exterior and turret cheek mountings, one of which you can see above but I still have more work to do on it before I share them with you.

That's all for this week, have a good weekend and have fun!

Monday 27 July 2015

World of Warships American Phoenix Class Cruiser

Hi all and welcome back to my (fortnightly now) early week ship review,

This week I'm going to be having a look at the American tier 4 light cruiser, the Phoenix. This is not a bad fast for its tier cruiser and once fitted out with the later modifications it becomes a real power house. Designs started for the Phoenix in the late 1910's to early 1920's. The design development that went into the Phoenix then got transferred into the Omaha class cruiser that we see at Tier 5 in World of Warships. This ship only existed in blueprint form as a new light cruiser was being developed to aid operations with flush deck destroyers.

In January 1915 the US Atlantic Fleet realised after recent Manoeuvres came to the conclusion that it lacked fast cruisers to provide much needed information on enemy positions, whilst being strong enough to deny the enemy of pretty much the same thing. This was in a response to the British Centaur C-class cruisers that had been launched in 1916. Even though the designs were eventually to become the Omaha, the design specification for the cruiser was to feature a 35 knot speed and mount 152 mm guns.  To achieve this the Phoenix sacrificed on armour protection to maintain its high speed and armament. As the Phoenix only ever existed on paper for that's really it for its history. I could go into the Omaha and its service history is going a bit off topic and I think I will save that for when I review that ship.


The Phoenix in world of warships I have to say is a little bit of a weird choice for War Gaming, to have both the Phoenix and the Omaha in the same tree one after another is a little disappointing as I would have expected some more variation. When compared visually they look very similar (due to them being more or less the same ship) which happens no where else in any of the tech trees for the Americans or Japanese. I'm not going to put this one down for laziness as Wargaming has produced a great game but it seems a little strange when there is definitely more ships that would have padded out the tech tree than a paper design. Still, this ship has been good to play so far even if the choice of ship is a little strange. In the long run really that's all that matters I suppose.

The first thing you will realise with the Phoenix is that is doesn't resemble anything that may have fought in the first world war. The tech tree predecessors, Chester and St. Louis resembled very much the look of an iron clad ship where the Phoenix starts to look a a bit more modern (well modern ish for early post WW1 Designs leading up to WW2). The guns are not quite in turrets yet but with the second/third hull upgrade you start to see side gun sponson's that were a precursor to the central mounted main armament turrets that were prominent in WW2 designs.


The First Hull of the Phoenix, Add Free Experience Here To Skip This Hull =D.


The Phoenixes Third and Final Form With Guns & More Guns.

For the Phoenix the hull upgrades are quite substantial in what they add to your ship. The first hull you get with the Phoenix makes you almost feel like you are playing World of Tanks. I have never felt so handy capped progressing a tier in any other ship than when I got the Phoenix. Normally its never so bad with the first hull on most ships but the Phoenixes is especially bad. This is prominently because the ship that came before it was the St. Louis and after it is the Omaha/Cleveland (if you have read any of my reviews before this one, you will be aware I think the St. Louis & Cleveland are amazing). Seeing 14 guns bristling from the St. Louis and then down grading to a less armoured 6 gunned ship is positively horrifying. For the Phoenix playing this ship when you first get it will not really give you that new ship buzz but the redeeming factor is that with each hull upgrade it adds more and more guns. For the American line that focuses on great guns, more guns just = more awesomeness. 


The Sleek Swept Back Lines Of The Phoenix Portrays The Ships Fast Speed.  


In the Phoenixes final form houses 10 x 152 mm guns as it main armament with a firing range of 13.7 km. This is a significant improvement over the St. Louis that had a 10.4 km range. The speed of the Phoenix sits at  35.5 knots which is quick for a cruiser at this tier. Another improvement over the St. Louis is that the Phoenix is one of the only American cruisers to have short range torpedoes. Like most of the American torpedoes they are rubbish when compared to the Japanese counterparts having a short range and relatively slow travel speed but in some instances its better to have them and not need them than not have them and need them. 

The gun fire rate is incredibly fast so lends well to players just starting out in World of Warships. Learning to shoot when first picking up the game is a bit of a skill. Not many players can get a new target in their sights, give the appropriate lead and get hits from the first salvo. That takes time and practice to perfect. If you miss in the Phoenix the guns reload so fast that adjustments can be made to your lead for the next set of rounds to be fired in the next few second. This makes the Phoenix very dangerous for destroyers as they will have to zig zag like crazy to avoid your fire. With your speed in the Phoenix in most cases you will just run them down.


A Mighty Jingle Ship Review!

The Phoenix has a few weaknesses, one being that it has very little in the way of air defence. Chances are you won't be shooting any planes in this ship so be aware of incoming planes to dodge their torpedoes or use support ships with strong AA to cover your ship. This isn't helped either by the fairly large detectability range of 13km by sea and 6.7 km by air so be cautious in your approach with this ship. Having speed can work against you, leave you unsupported out in front only to get hoarded by planes.

The second most prominent weakness is that armour is rubbish! This is a light cruiser which sacrificed armour for speed and guns, so expect everyone to shoot HE at you (which seems to be all people fire these days anyway as no one understands AP enough to use it in the correct situation). Anyone that fires AP will be doing you a favour as most shots will over penetrate, pass through the ship whilst causing minimal damage. The high amounts of HE fired at you gerenally means you will be on fire a lot. Make sure you have a decent fire prevention on your commander or in your ship upgrades. Due to the low amounts of armour this also means that the ship doesn't have a great HP pool to rely on. Intelligent use of your repair control cool down is needed to manage the inevitable fires whilst in combat.

This ship is very manoeuvrable for its tier set having a 2 second rudder speed advantage over its Kuma equivalent and a 1.6 second advantage over the tier 5 Furutaka. This ship will handle very similar to a heavy destroyer being fast turning and high speed but with the benefit of having cruiser sized guns. 

To conclude on how to play this ship, use that fast speed to push up early with other cruisers and destroyers. Getting eyes on the enemy early on will help bigger guns get in the fight early on and also give you the chance to do what this ship was designed initially for, killing destroyers and other light cruisers. Take the chance to shoot at destroyers early on as you will have a larger health pool to trade and with your fast firing guns with good range you can really give them something to worry about. When fighting other cruisers and battleships take a mentality of wolf pack lone ships/ groups of ships. This cruiser was designed to support destroyers (this is why I talk a bit about the ships design ethic at the start so you understand what it was designed for) so work as a team and keep in mind the longer you expose yourself more fire you will receive. Taking on Battleships and taking citadel hits can one shots you as you only have 24 k hp so pop in and out of cover and use your high firing arch to get plunging fire.  Having light armour and being easier to hit than a destroyer means you will have to me more mindful of ships firing at you to react in time to dodge their fire. Having low amounts of armour this ship works best at about the 12 -10 km range. Getting into close range brawls is not this ships thing but if you have been surprised by a sudden appearance of a ship sailing around a headland remember your short range torpedoes. They have a 5.5 km range (so don't go firing them willy nilly at long range targets, its just a mistake I keep seeing where players think they have some kind of super range) so gives you a fighting chance against battleships and heavier cruisers at close range but don't go relying on them (but don't forget them either as they are your trump card). The American thing is big rapid firing guns and this ship can dish out the damage so keep the guns singing and dish out a hot shower of death on the enemy. The Phoenix really benefits from its advanced hull upgrades, getting more guns and AA with each step. My recommendation is to get them early on with free experience if you have it. This will avoid a hard grind for the higher hull refit levels which I can't recommend. The Pheonix isn't a bad ship but being surrounded by the Omaha and St. Louis in the tech tree which are both better ships for their tier, its not going to be a permanent fixture in my Harbour but its still a fun ship to play.


Up Supporting The Destoyer On This Flank


Thats all for this ship review, catch you later on in the week for my Tiger tank update =)


Friday 24 July 2015

Tiger Tank: The Turret Chin

Hi and welcome back. I've been busy modelling away this week with my Tiger, so for this weeks update I'll be showing you my progress with the Tigers Turret chin

Throughout the tigers development during world war 2 the turret went through substantial changes to reduce the complexity of its design. This was a effort to lower sizeable amount each Tiger cost to make and also the time needed to complete each individual tank.

For the Turret Chin, it went through one significant change to decrease its complexity. Early Tigers had a 'L' shaped design that fitted into tight complex cuts on the underside of the turret side armour.


Early Tiger Turret Chin Design

Later designs of the Turret incorporated larger cuts into the turret walls to fit a simpler designed part .


Late Tiger Turret Chin Design 

I already had my turret side walls modelled as I have shown in previous posts, so I had to put cuts into it to accommodate the new chin I was modelling. Due to me doing a early Tiger this meant that I had the more complex design to do. I decided to cut the recesses for the welding to go into into the turret walls as well to give it a bit more authenticity.


My Model With The Early Turret Chin Cuts

Next was modelling the Turret Chin itself. The Chin was 100 mm thick and in early Tiger design was up to 120 mm thick in its upper half. The image below shows the L shaped design of the early Tiger chin along side its later design.


The Above Image Shows Thickness's for Early and Late Chin Designs


My Turret Chin Fitted In Place

Now for the finishing touches, I added welding to help finish off the look using the recesses I created.


In Go The Welds

This is my turret as it currently stands, I have been busy getting ready to add the frontal armour bars that sit at the front of the tiger. I have done a bit more work with separating the top armour and adding more welds to match the real life tank.


Tiger Turret Work In Progress Thus Far

I still have to do some of the welds for the escape hatch (reminds self) but next week I will be working to get the frontal armour plates in with the gun sealing frame. This could be a 2 week job to finish off but it will be worth it. I can then look at doing the Gun Mantlet and 88 Gun itself which I have been thoroughly looking forward too. I am planning to model the track link holders ( with track segments) and grenade launchers as the are on the Tiger 131 so don't worry if you have noticed that, I haven't missed them =D.

That's all for this week. I will see you back here early on next week for a ship review for World of Warships. Till then have a great weekend!


Friday 17 July 2015

Tiger Tank Turret Escape Hatch

Hi all and welcome back for another Tiger Tank update.

This week I have been modelling the escape hatch that is situated at the back of the Tigers turret. The shapes on the hatch were a nice challenge and pretty fun to model, so I hope you like what I've done with my progress this week.


Tiger Turret Escape Hatch Location

The escape hatch was regularly used as a way of restocking ammunition that had been used in combat. The hatch due to its thickness was very heavy. The weight of the hatch meant it could not be closed once opened from the inside; someone had to stand on the rear above the engine deck to physically lift the hatch back into place. This was a major complaint from crews throughout the war but was not something that was corrected. This was probably due to the lack of materials that Germany has at the time of the Tigers production to add such a minor change to something that was really only needed at times of emergency or restocking ammunition. The hatch was locked from the inside and the edge was lined with a rubber seal for deep wading.


Turret Escape Hatch Hinge


Tiger Turret Escape Hatch


The lid for the hatch was 80 mm thick that sat within the asymmetric horse shoe shell of the Tigers turret wall. The lid was flat unlike the rest of the curved turret wall surface but the lid met almost flush with the escape hatch sides due to its distinctive cuts along the circular side edges of the hatch lid. 


Here is my model from this weeks work, I hope you like it. If your wondering why I haven't the inside of the hatch I have decided not to do the interior of the tank as that would double the amount of time to finish the model. I may go back at some point after finishing the tank and look at the interior but I think for the mean time I will just do the exterior.  

I will only be doing my later post next week on my tiger tank. I feel a little stretched with work, gaming and posting on my blog. To get more work done on my Tiger I'm going to sacrifice some gaming time to get some more 3D work done. It's harder for me to get ships now in the open beta (due to the larger xp required to unlock ships) to do reviews on so it makes sense to slow down a bit with my ship reviews. I hope you understand but rest assured I will continue to do ship reviews, but probably on a fortnightly basis. I will however continue with my weekly tiger post so you guys know how I am getting on with this beast of a project =D.

I hope you all have a good weekend and I look forward to seeing you here next week.  

Tuesday 14 July 2015

Imperial Japanese Furutaka

Hi all and welcome back for another ship review.

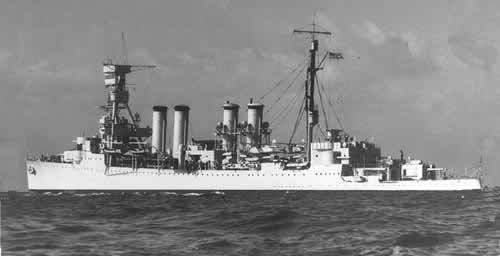
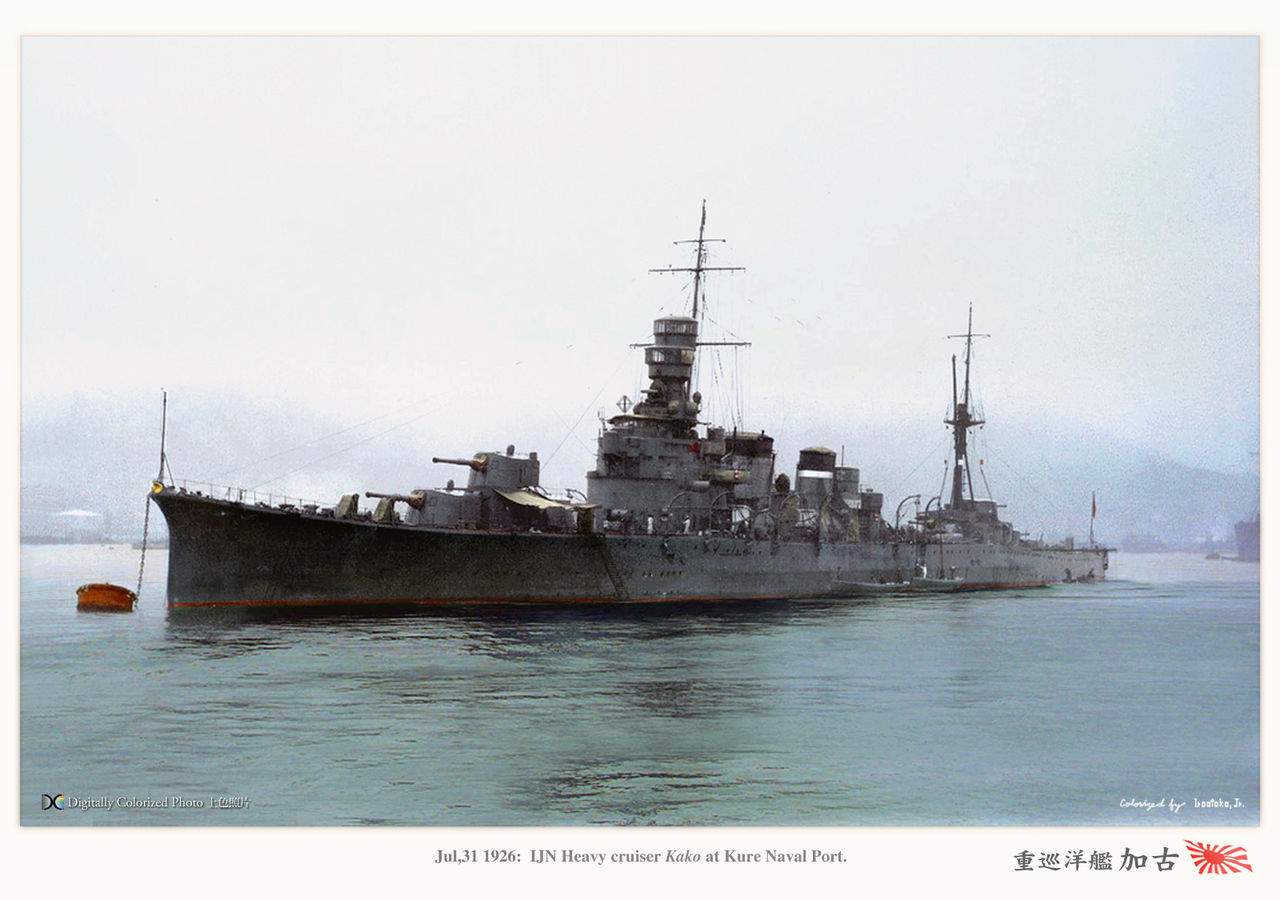
This weeks ship of focus will be the tier 5 Japanese Furutaka. This is the first cruiser in the game to have 203 mm guns. This 'up gunning' changes how this ship should be played coming from the previous tiers Kuma and Tenryu Class Cruisers.


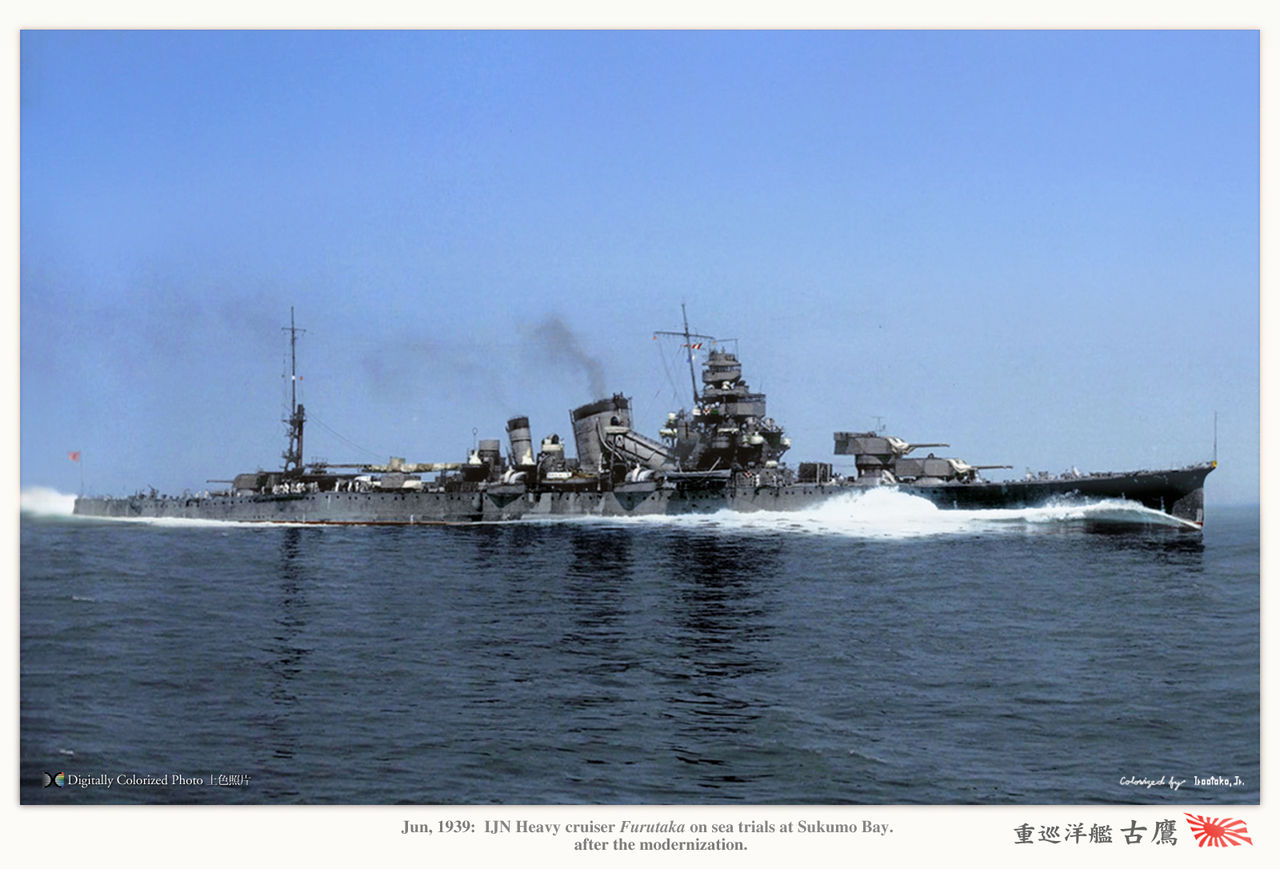
The Furutaka was the first generation of the Japanese navy's high speed heavy cruisers. With the development of the American Omaha (also in World of Warships) and the British Hawkins class scout cruiser the development of a cruiser capable of dealing with this new threat was needed. Following the earlier experiments from the Yubari cruiser, (See my previous ship review on the Yubari for more info) the lessons learnt from that ship were transferred into the design of the Furutaka. The Furutaka was laid down in the 5th of December 1922 and launched on the 25th of February 1925. Upon her initial commissioning in 1926 she was assigned to the 5th cruiser division until 1931 where the Furutaka was placed in reserve fleet. She underwent significant refits during the 1930's where she was fitted with more fire power and defensive armaments.The Furutaka was fitted with a plane catapult which solved the much complained about problem of having to lower planes into the water before they took off (not particularity handy in an engagement).


Her final refit in 1937 saw the Furutaka received her trademark 201 mm guns that we see in World of Warships (203mm in World of Warships but I'm not going to deliberate over 2mm... they are still big guns for a cruiser), new oil fired boilers and the extra addition of new 'Long Lance' torpedo tube mountings.

Entering WW2 the Furutaka was involved in the invasion of  Guam which happened at about the time of the Attack of Pearl Harbour.  After the successful occupation of Guam and the following attempt at capturing Wake Island which had failed, the Furutaka was assigned to cruiser division 6 where the Japanese successfully mounted a second attack and occupied Wake island on the 22nd of December 1942.

The Furutaka was involved in the Battle of the Coral Sea where she was tasked with the escort of the light carrier Shoho. Following a 2 day attack which started on the 7th of May 1942, the US Carriers USS Yorktown and Lexington succeeded in sinking the Shoho and severely damaged the Shokaku carrier. After the attack Furutaka was tasked with escorting the battered surviving Shokaku carrier to Truk for repairs.


August 1942 in the Battle of Savo Island, the Furutaka took part in an successful attack against an enemy fleet. Under the cover of darkness with flares dropped by spotter planes to silhouette the enemy ships,  the Furutaka accompanied by the cruisers Chokai, Kako, Kinugsasa, Tenryu, Yubari and Destroyer a Yunagi, attacked by firing multiple shells and torpedoes. The resulting battle ended with the Heavy Cruisers USS Astoria, Quincy, Vincennes and HMAS Canberra being sunk. Heavy Cruiser USS Chicago and destroyers Ralph Tabot and Patterson being damaged. On the Japanese side a total of only 6 shell hits were received.

The Furutaka's conflict in the Battle of Cape Esperance (also known as the second batle of savo island) was to be her last after an attacking American fleet successfully managed to cross the fleet containing the Furutaka's 'T'. In the confussion of the Attack the Japanese fleet thought they were under friendly fire and began a 180 degree turn. The Aoba was heavily damaged as the ship exposed her sides in the turn.


The Furutaka fell out of the line of battle to engage Salt Lake City only to find herself coming under fire from the destroyer USS Duncan. After numerous shell hits the Furutaka was put out of action, where she was later to be hit by a Torpedo. Combined with up to 90 shell hits her storage of Type 93 Long Lance Torpedoes seated in her mid decks finally went up from the resulting fires. The Furutaka sank stern first with the loss of 33 and 110 counted as missing. 514 survivors were rescued by 3 passing destroyers. 115 were captured by the American fleet.

In World of warships the Furutaka is a tier 5 cruiser. I have found this a ship that has some draw backs that many players (including myself) have found challenging to grasp. The Japanese get their big caliber 203mm guns on the Furutaka and upwards. Due to this up gunning the Furutaka subsequently suffers from a rate of fire loss which in turn results in a big damage per minute disadvantage against the American nations cruisers . The lack of rounds per minute and slow turning of the turrets mean this is not a brawling ship and seats more in a support ship role. Given the opportunity to put down fire on the enemy the guns can really show its superior caliber. Taking fire and manoeuvring to avoid the shells causes this ship its main problems as I will explain as go through comparing this ship to its alike tiers.


First we will start with the Furutaka's good points. For a Cruiser the Furutaka has a decent health pool and has a good Torpedo armament for a cruiser. The Guns are very punchy and have good burst potential if using cover to your advantage between shots. As the guns are of larger caliber they do more reliable damage against armoured targets so have more chance of citadel hits. As a Japanese Cruiser you have a better concealment rating than your american cruiser equivalents but at 12.2 km this is no destroyer. She has a good top speed too so will be normally up alongside the destroyers in the initial engagement. Unfortunately that's really all this ship has when looking at it on paper.


This ship was oringinally designed to specifically destroy Phoenix/Omaha Cruisers but its horrible turret rotation speed and rate of fire of the guns that really let this ship down in World of Warships. The Omaha (Tier 5 American cruiser) in a straight up gun duel can put out over double the amount of damage per minute than the Furutaka with its guns alone (assuming all shots fired are AP and hit citidels the Furutaka has a DPM of 98700 and the Omaha has a DPM of 213280). Even the Phoenix Cruiser vastly out damages the Furutaka in a one on one duel where in lies the first major weakness of this ship. It just can't dish out the damage when its needed to so leaves you in a arisen of trying to dictate the engagements.

This is the First ship I have looked at and feel it needs a decent buff to make it competitive. Being a Japanese ship with such low  rate of fire you would have thought that the turret speed may be ok to compensate... Nope, its 45 secs for 180 degrees turret rotation... like a battleship (face palm). The Omaha has a 24 second 180 degree turret rotation speed. I could carry on with this but you know where I'm going with this... Bigger in this instance definitely isn't better. The Furutaka does however have a secondary armament that can support up to a spectacular range of 4 km. This short range really isn't going to help you in any instance unless you have a destroyer trying to suicide run you.

The main guns slow rotation speed makes you have to straighten out in dangerous situations to get guns on target. where the ship doesn't really have the armour to take prolonged punishment its definitely a risk business. This makes you an easy target for enemy gunners and in my opinion is the single worst thing about this ship.


Due to turret number 4 due to being next to the plane catapult, it has a limited firing arc. In most situations won't be able to fire that turret at what ever your aiming at as you should be angling your armour against fire to maximum the ships armour potential and make yourself a smaller target.

This isn't the most manoeuvrable of cruisers, having quite a large turning circle and slower rudder shift speed for a cruiser. Its not terrible or unworkable when it comes to dodging incoming fire or torpedoes but its still not up to the American cruisers standard. The manoeuvrability mixed with the ships decent speed working fairly well when getting out of dangerous situations however but doesn't have such a superior speed advantage where you could run away from other cruisers. The speed is good enough to chase most fleeing destroyers down so that's definitely a plus for the Furutaka

This really looked to be a terrible ship to play when as I am working my way along the Japanese Cruiser line again. It has some very horribly noticeable weaknesses that are by no means hard to miss. Surprise however when I played in this ship it didn't completely suck. Knowing its blatant weaknesses and playing this ship as a burst damage support ship seems to suit the Furutaka's characteristics of play.

You will not be brawling in this ship as you won't rotate your turrets fast enough to keep up with throwing the ship about and targets circling you.  The guns are reliable in that they do decent damage consistently upon hitting their target. She does seem to be better armoured than the american tier 5 light cruiser and does benefit from angling the armour from incoming cruiser/destroyer caliber AP shells. Getting into engagements where you can work as a team and sit behind close range specialist brawlers. Keeping attention away from you whilst dishing out damage with the bigger guns is the way to use this ship. Going alone against other ship will get you focused down quickly and it can be frustrating knowing you are getting your ass handed to you by rapid firing lower tiered ships spamming HE shells.


Don't get me wrong I don't think this is a horrific ship but I don't think its great either. The Furutaka is one of the biggest missed opportunities for Wargaming World of Warship team to make a really fun ship and all it would take is a slight buff of turret rotation speed and fire rate. I can deal with the manoeuvrability being worse but giving half the amount of damage to an equal Tier is pretty bad balancing in my opinion. Its not impossible to do well if you correctly position your ship in battle but in most instances this is very situational and won't always work out in your favour. With HE being so effective against armour in the Open Beta it negates a lot of this ships big gun caliber advantages. it will be interesting to see if any changes come in to effect that may make this a more competitive ship

That's all for this weeks review I look forward to seeing you back here for my Tiger Update later in the Week.


Friday 10 July 2015

Tiger Tank Stowage Bin Continued...

Hi and welcome back,

Just a quick update on my Tiger stowage bin progression. Its completion has been a little show this week as I have been taking it a little easier with my late night working. I made a bit of a mistake which wasted a bit of time on but ill let you know about that as I go through this post.

This week I have been modelling the lock mechanism for the stowage bins that currently exists on the Tiger 131.  Its not been easy to get some decent close up reference of the locks. I recently bought the Haynes Tiger Tank maunal. This book Just happened to have the image I needed so that was a massive stroke of luck.


I have found it a fascinating read and for the price of around £10 good bargain as well. The book talks about the design choices made, design specification changes throughout the various model designs and different concepts this tank went through before the final design that recognise today came to fruition. The book also covers the Tiger war developmental changes during the war and following tank conversions such as the almost ludicrously armed Sturmmorser Tiger.


The Sturmmorser Tiger Sporting the 38cm RW61 Rocket Assisted Morter

I mentioned I made a error whilst doing the clip and lock for the Stowage Box. Whilst doing the Lock I decided to do as a complete mesh rather than splitting away the geometry as separate elements.

After finishing my first lock I realised that to save on the over all poly count (and have nicer geometry) it would be more efficient to split off the problematic geometry. I remodelled the Lock again as separate parts and here was the results


Non Smoothed Geometry (first model on the right new one on the left)


Turbo Smoothed Geometry

I don't know what I was thinking when I decided to try do it in one mesh but as you can see from the pictures, splitting the object up is so much more efficient and neater.

With the lock modelled I went ahead with the latch that it attaches onto the Stowage bin. 

This brings me up to my current work in progress level. I still have a bit more to do, adding welds and positioning some of the metal brackets. Hopefully I'll be moving towards for front of the turret with the distinctive mantlet and gun of the Tiger in the coming weeks.  I hope you all have a good weekend and I'll see you here next week.


Tuesday 7 July 2015

USS St.Louis, The Keeper of Guns and Future Seal Clubbing.

Welcome back for another ship review on my Blog. Things over the last 2 weeks have been a little crazy with Berlin and also with going south to Lands End (in Cornwall, UK) on a last minute trip. Needless to say I haven't had a huge amount of time for gaming these past 2 weeks but what I have saved for this week is a ridiculously good tier 3 Cruiser that throughout the closed beta I had a fair amount of fun playing.

All the way through the closed beta, every player that I talked to loved this ship and many came to the conclusion that they would be keeping a harbour slot ready for it when the open beta went live. This ship is of course the USS St. Louis. When fully upgraded this little power house sports 14 rapid firing guns that would give butterflies to even the hardiest of American redneck's. The St. Louis is equipped with ample amount of armour so can be a real pain in the ass to kill without taking large amounts of damage in return.


To see just how typically American this ship is you only have to look down the length of its port and starboard sides to see multiple barrels poking their way out of the hull. This ship pretty much sets the standard for all American cruisers to come. Where the focus of Japanese cruisers is a mixture of guns and Torpedoes the American cruisers do away with any distractions and focus on high DPM Guns.


The St. Louis and The Cleveland are pretty much indicative of this characteristic in the lower tier game play and demand respect from all opposing players that encounter them. Needless to say that these 2 cruisers will be common place in all good captains harbours in World of Warships as they are so much fun to play.

Historically in real life the USS St. Louis (C-20) had a pretty unremarkable service history. The St. Louis was launched in 1907 after sea trials to the Pacific Fleet. During her design phase the consensus was made for improvements on the existing Columbia class cruiser design to which she would be based upon. The decision was made up the armour her hull in comparison to other Columbia class cruisers, increasing her displacement from 6000 tons to 9700 Tons. This made the St. Louis a fully fledged protected Cruiser. With all the extra armour that was fitted to the cruiser and in a bid to save weight, the St. Louis was fitted with 6 inch guns rather than the standard 8 inch. A larger power plant was also needed in the ship to counteract the extra weight from the added armour. 


Throughout the St. Louis's service life there was only one point of note but this didn't really involve the ship but more the crew that manned her. On the 4th of Feb 1917 the crew stopped the scuttling of a interned German Sloop Geier by boarding with an armed party. The Geier was captured before her planned scuttling and ended up serving the United states under the new name of the Schurz. The St. Louis was mostly consigned to transporting goods and convoy escorts other than this singular event. The St. Louis was eventually decommissioned and scrapped in 1930.


In World of Warships this is a stonkingly good tier 3 cruiser. This ship is literally crapping guns with fourteen 152 mm guns with a secondary armament of eighteen 76.2 mm guns. On a tier 3 Cruiser this ship even can hold its own against battleships of equal tiers. Having so many rapid firing guns makes this ship a real threat for destroyers and other cruisers. The St. Louis has almost 30K of hit points and is very heavily armoured for a cruiser. This means you can weather a fair old chunk of punishment before going down swinging. When compared to the Japanese T3 Cruiser you can really see this amplified when the Tenryu has a mere 17.7 K HP. 


Having 6 guns on both the port and starboard sides of the ship and one rotating turret in both the fore and aft of the ship. This means with additional 2 guns that can rotate 180 degrees on the deck you can have a maximum potential 8 guns on target when firing a full broad side. Due to the positioning of the guns facing directly outwards from the ship you won't have to wait for your turrets to turn when changing directions. You will always have some guns on target if you get surprised by the enemy or if you have to switch targets.

With all these great advantages there has to be some disadvantages that stem from its historical design choices that favoured many guns and large amounts of armour. All this extra weight ladened on a cruiser makes the St. Louis suffers most in its speed and rudder shift time. Torpedoes will be your biggest nightmare as the St. Louis drives very similar to a skip and doesn't respond well to sudden threats. The gun range isn't great either at 10km, presenting the danger that many ships can use their speed and range to keep you at a distance where by shoot you without you being able to respond in kind. Not many players will be wise enough to realise this at tier 3 and will generally close to shorter ranges where they can actually hit you. This will be playing into your hands and the strengths of your ship especially if they close into your secondary range adding to your ginormous gun array. 


One thing to note with the St. Louis is it doesn't have a great concealment range so being careful with your approach using some cover in the initial stages of the match is best advised. Most Battleship captains will always choose to shoot at a cruiser they know they can get big numbers of damage from over another opposing well armoured battleship.

In conclusion with this ship, the key to your success in this ship is to simply keep the guns singing. You have lots of them so use your main strength as much as you can. This is a strong cruiser for its tier but its still a cruiser and charging into to many enemies will normally get you focused down even if you can put up a fight. When facing off against torpedo baring ships try to predict when they will be firing their torpedoes and start your evasive turns early. The speed and rudder shift time are terrible on this ship but the turning circle is good. Reacting early in these dangerous situations will help you survive. Doing aggressive manoeuvres in other ships tends to leave you having to turn turrets around to defend yourself but with the gun arrangement in the St. Louis you can fire continuously and cause your enemy to retreat under a withering hail of fire.


The characteristics of captaining the St. Louis feels very similar to the HMS Warspite with her fairly slow speed, good armour, slow rudder shift time and good turning circle. Not to mention they both have fantastic armaments. If you find yourself getting on with the St. Louis I would highly recommend looking at the Warspite. As you can see below you can get great results from the Warspite once captained properly.


Until later in the week take care and I'll see you back here soon.


Friday 3 July 2015

Tiger Tank Stowage Bin

Hi all and welcome back for my late week post.

This week I want to show you where I am at with my Tiger Tank. I have been looking at the Stowage bin that typically was seated on the back for the Turret.


Tiger 131 Getting Some Maintenance 

I referred to my usual places to get some sources to get dimensions, measurements and source imagery for reference. Having done some digging I found that there was a few positions that Tiger Stowage bins were placed other than the typical back of turret arrangement that many will be familiar with. They also differed in shape similar to that of panzer 3 Stowage bins.


The Standard Back Bin Arrangement


Late Turret With Typical Back Stowage Bin

Some of the Stowage bins like the Bin that was attached to the s.Pz.Abt.502 Tiger companies didn't have the bowed out design like what is on the 131 Tiger. It was a single lid design that had parallel sides.


Early Turret Bin Designs Used by the s.Pz.Abt.502 Tank Companies.

There was also a wide bin arrangement that was the first design for a turret bin on the Tiger which was quickly made obsolete by covering over new port and hatch designs. The bins were attached to Some of the early Tigers that were shipped to Africa in November 1942.


First Stowage Bin

There were also side Bin designs such as shown in the picture of the tiger tank on parade in the picture below.


Side Bin Arrangement

For my Stowage bin I am looking at the same design as is currently on the Tiger 131. This is the standard rear stowage storage bin that is recognised as the stereotypical design on the tigers turret. Its design is featured in World of Tanks and War Thunder ground forces also.


World of Tanks Tiger


War Thunder Tiger

I still have more work to do on it bin, such as weld lines, clips and locks for the lid covers. I also have to clean up the geometry to get a cleaner curve but you can see the direction in which the model is going before I marry it up with the rest of my turret. I'm away this weekend again in Penzance on the southern part of the UK so I wont be finishing this off this weekend but will probably get this finished mid next week. I have pans there on to start on details at the front of the Turret getting the mantlet and 88 guns modelled. I have been leaving these till last as I think they will be the most fun to model out of the Turret so far.


Tiger Tank Stowage WIP by dna87 on Sketchfab

That's all for this week! I hope you all have a great weekend and make the most of the nice weather that seems to be happening throughout the whole of Europe.