The Order for the deveopment of a 45 ton heavy tank with a 88 caliber gun was put forward to Porsche and Henschel after Nazi Germany ran into trouble fighting T-34's and KV-1's in Operation Barbarrosa. The Current Panzer 3 that the Germans were fielding had the 5cm KwK 38 L/48 which was only capable of beating the armour of a T-34 at close range at the side or rear.
,_Panzer_III.jpg)
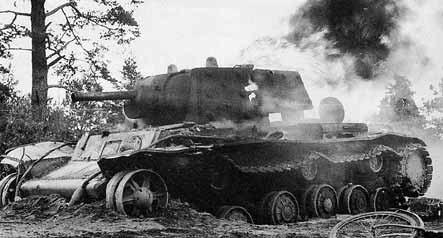
The KV-1 was impervious from every angle the panzer 3 shoot at it from, even at close range. The Flak 8.8cm was the only gun that the German forces had deployed that had the power to defeat the T-34 on its frontal armour and stop a KV-1 dead.
So the after the designs for a 45 ton Heavy tank were submitted it was the Henschek tank design that was taken forward to mass production. With 100mm of frontal armour, the Flak 8.8cm modified for tank use and the 21.35 litre 650hp engine even in its early stages it was a formidable beast.
The Tiger Tank although a superior weapon was famous for how complex its design was. The Tiger Cost double the amount that a Panzer 4 cost to produce and 4 times as much as a Stug 3. This accounted for the short number that were deployed in World War 2 and also why so many Tigers exist in decent condition today (not many survived the war and post war scrapping).
Bovington Museum houses the only running Tiger, the 131 that reciently featured in 'FURY'. A movied up untill the last fight scene believably reconstructs a tankers life in combat.
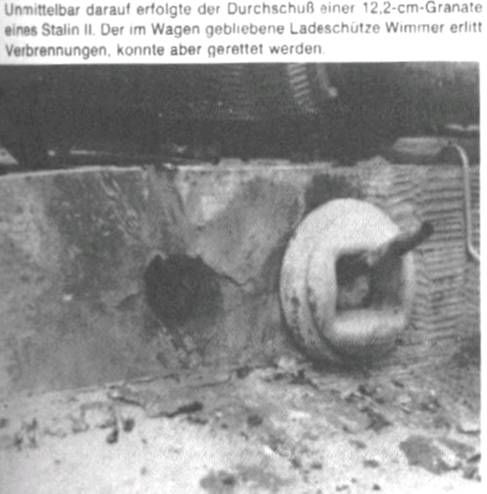
In later Stages of the war other nations tanks had started to incorporate guns that were capable of countering the tigers armament such as the British 17 Pounder Gun and the Russian 122 mm Gun.
So with the brief history of the Tiger out the way I can give you a bit of a update on what I have been doing to give reconstruct this beast of a tank.

I Decided that I would like to go about recreating a early production model of the Tiger Tank. Unlike the picture above which is a late model. After my usual reference finding and image collating
I decided to start with the Turret as this really gives the Tiger its silhouette a defining shape. I started modelling the turret and ended up finding too many discrepancy's with the blueprints that I had collected found. I did a bit more research and found a amazing site that I started working from. Most of my reference of Tigers have come from this site which is amazing by the way and I recommend anyone who is modelling a Tiger to check this out http://tiger1.info/ . Blue Prints are great for getting a overall shape but there is far too many times for my liking that blueprints don't line up perfectly so i wouldn't trust just one set by its self until I have done some proper research.

Initial Block Out

When I figured things Weren't quite right

Remodelling bits to measurements and specifications using old modelled parts
The turret is quite a interesting, the first thing to note its a asymmetric design with 80mm turret wall armour all around in one piece of metal. The turret top armour in early models was 25mm thick, so having these two thicknesses positions and how they slotted together getting the innitial shape for the tank was pretty easy.


I then moved on to the loaders hatch and vent getting them nicely detailed up. www.tiger1.info has all the measurements by a guy that was building a CAD model so I cant fault the amount of resources this guy has put together to get a accurate result.

Being lazy or unwilling to try modelling welding at this point really I have had to give it a shot to see what I could come up with so admittedly this is a work in progress to get the right results but anyone that has tried to get a good looking weld will know there isn't a lot of tutorials out there to get amazing result (if you know of some please throw them my way =) ) but I managed to get this result using deformed spheres welded together so they are all in quads. (I may get a tutorial together after I have finished to show you how I have done it if your lucky =P)

Im going to continue to Develop this weld technique so I can get it looking pucker as there is going to be many weld lines in this tank. My next focus is once I have a way to get welds looking nice I will work it into my hatch and air vent where required them move onto the commanders cupola and support bars at the front of the turret ready for the cheek mountings and mantlet to be introduced.
That's all for this week folks.
No comments:
Post a Comment