This is a personal blog of a professional 3D Artist from the moment I picked up a 3D program to present time. It contains my interests in games and my modelling practice, mixed in with things that I have found interesting over my time writing on it. I pride myself with being able to put myself into my writing so don't be too shocked if you see some of my own twists on making points here too.
I thought I would give you an update on how I have been getting on with my portfolio work. I am happy to say I finished off my Rifle today so I'll be sharing that with you. I posted up where I had got with it but felt that it needed a sight adding to it to brake up the top rail of the gun. Since posting up my last post I modelled a high poly reflex sight, baked it and textured it. I have a few renders to share as well as the models I have done.
Here is the exploded high poly model I did for the reflex sight as well as the modelled low poly bellow.
Here was my bake I got out of X Normal and Substance Painter.
After a bit of tinkering in Substance Painter and some playing about with Marmoset 2, here are the fruits of my work.
This was just a quick update on how this has gone. I hope you like the results. Hope to see you here again soon, especially now I will be finishing my Tiger Tank now.
Hi all and welcome back to my tiger tank weekly post.
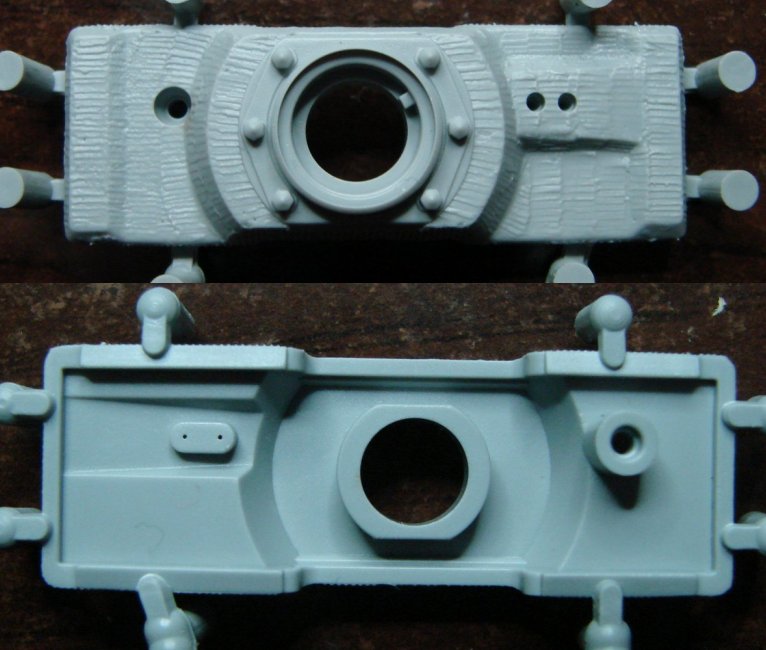
This week I have made a start on my mantlet for the Tiger Tank. I originally thought that there was only two variations of the turret mantlet, one from early production and one from its later production. This was mostly down to that there is one very visual difference between the two which is the reinforced bar that runs across the telescopic vision port holes. I didn't really have too much knowledge on that and took that visual difference as the main distinction between the two.
Late Production Mantlet
Tiger 131 Early Production Mantlet, Recognisable by the Visual Bar on the Right Being Absent
Looking around for more reference imagery I came across this image that illustrates the variations of mantlet during the tanks development throughout the war. It's pretty interesting to see how the shape changed and decisions made to aid the tanks combat performance.
A Good Illustration of Mantlet Development Thoughout the War
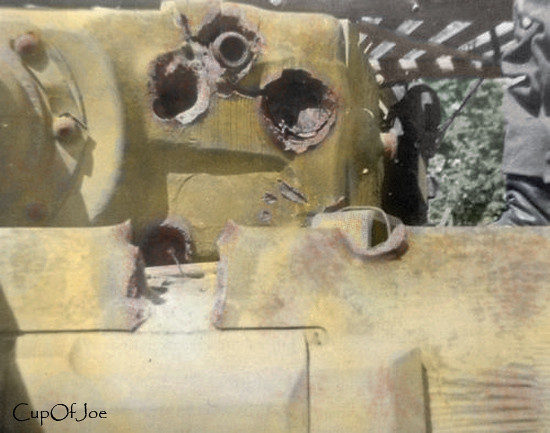
Adding sun shields and magnetic bomb protection were an obvious additions to aid the crew with vision and survivability. However the added armour to the telescopic openings and side cheek is not so obvious a decision. These must have been added to counter where the tiger was taking hits on the mantlet but this is me just speculation from the images I have seen from battle damage. it could also be a addition to accomodate additions to the internals but I will have a more in depth look at this for next week.
Battle Damage Mantlets
A Shell is Still Visible, Stuck in the Mantlet of this Battle Damaged Turret.
Here is how I have been getting on with my modelling for this week. I already had the gun sleeve modelled so I just had to use this as a base to build the mantlet around its shape. I know I had modelled the Sleeve with the correct radii and thickness's so this gave me the recess depth and shape for the mantlet as a starting point.
As you can see this is still a work in progress. I have a fair bit of work to do on this, cleaning up with some of the model pinching and also completing the back part of the mantlet where it connects to the trunnions. I'm pretty happy with the progression so far although its no where near done to the amount of detail I want to be. Part of my meticulous nature is that im never happy with what I've done when I've finished it. I guess this keeps me on edge to progress further with my work and continue to improve. Stay tuned for more updates on this one, the mantlet is one of the defining characteristics of the tiger and I definitely want to do this one right.
Thanks for your continued support and visiting of my blog, I very much appreciated. I hope you all have a good weekend (and if your in the UK a good bank holiday weekend) and I will catch you here next week for another Tiger tank progression report.
Welcome back to my blog for another World of Warships ship review,
I have a little bit of bad news to start off. Next week I will be away in Berlin for my first holiday in like forever (4 years to be precise... getting a stable career in the 3D Industry is a bit of a killer) so please forgive my absence but I will be doing an extra post this week which will go out on a delay for the coming week. It means a little more work for me this week to do so but at least you will be getting something here over the time that I will be away. I am planning on visiting the Berlin Museum of Technology so I'll be posting a few images from that up here when I am back for all those people that like efficient mechanical things.
For this weeks Ship review I will be taking a look at the Kuma class cruiser from world of warships. This capable cruiser is Currently a tier 4 cruiser (as all is subject to change in the Closed Beta). This cruiser has a well balanced stats and load out so read on and I'll give you the overall comparisons to its equal tiers. If your not interested in this ship I'll tell you about its weaknesses so you can seek to exploit them if you happen to cross guns with them.
The Kuma Cruiser
With the development of the new Omaha Class light cruiser following the end of World War 1 the Japanese Navy realised that they would be in danger of being out gunned by their pacific neighbour. With the Development of the Minekaze that had a formidable speed of 39 knots, the current Tenryu class cruiser, that had a maximum speed of 33 knots, were unable to keep pace. The long range Torpedo, the Type 93 Long Lance, was developed in the 1930s so plans were drawn up to create a special ‘Night Battle Force’ of torpedo cruisers. With the new development of the Type 93 these torpedoes had a longer range than most Battleship main armaments, the idea of the new cruiser development was to attack at night with a over whelming barrage of torpedoes. A later force would then follow up the morning after the night battle to dispatch a critically damaged enemy.
WW2 Kuma Class Cruiser Photo
The Kuma class cruiser was built between 1917 - 1921 and commissioned into the Japanese Navy between 1920 - 1946. Only 5 Kuma Class Cruisers were built, the Kuma, the Tana, the Kitakami, the Oi and the Kiso. Four of the Kumas were sunk throughout the course of the second world war. The Kitikami was converted into a torpedo cruiser before the second world war. For those that play World of Warships you will recognise this ship as a premium tier 8 cruiser. This may seem high when considering the Kuma is only a tier 4 cruiser but when you find out that the conversion put 40 torpedo tubes ( 20 each side) you can see its potential to just fill small island channels with a horrendous numbers of submerged torpedo death.
The Kitikami... ALL the Torpedoes
The Kuma sported seven 14cm guns in central line individually mounted turrets but due to their positioning a whole broadside would only be able to bring 6 of these to bear. The Kuma wasn't quite done their as it also carried 8 long range 533mm torpedoes as back up to its main gun arsenal. The Kuma lacked in anti air armament like its Tenryu predecessor. The two 8cm 3rd year type naval guns and two 6.5mm machine guns were not going to be repelling any determined air attack. Even though the Kuma class was Heavily disadvantaged in AA fire power it was Torpedoes that finished off 3 of the 4 sunk in total throughout World War 2.
Kuma Class Cruiser Stats
The Kuma in World of warships is a balanced ship where it currently seats in the tech tree when looking at its stats long side the Phoenix and Omaha cruisers it seems to be well balanced. When compared directly with tier higher tiered Omaha (which the Kuma was designed to compete with) it has slightly longer gun range, a longer torpedo range and better concealment ranges as it characteristic of the strengths of most Japanese ships. The Omaha trumps the Kuma with its gun caliber (getting 152mm to the Kumas 140mm), gun amount (having one extra gun) and a better manoeuvrability. This makes it a pretty good little ship for cruiser captains even when facing slightly higher tiers. The Kuma will always have to fear a engagement with the Cleveland class cruiser. 2 tiers above, the Cleveland will always present a significant threat due to its rapid firing guns (even high teir ships don't like this ship) but I think it's a little overpowered at the moment with what its capable of doing and will probably get hit with the nerf bat at some point (you may or may not agree but this video shows what its capable of).
The Mighty Jingles Presents The Cleveland
Having more health than both the Phoenix or Omaha means you can take a little more punishment that your american comparisons but the slower rudder shift time makes you less responsive to threats and dodging fire/Torpedo attacks.
In conclusion the Kuma is a well balanced ship with all the good parts of the Japanese characteristics. Its the first ship in the Japanese cruiser line that you will start to get a good feel for the direction they will be headed in future tiers. The T3 Tenryu felt more like a big destroyer than a cruiser so the Kuma is a more welcome divide from the early tiered gunboat style mixed play to more a specific class personalities. The extra range with fairly quick torpedoes again give a fighting change against Battleships without having to wade deep into their secondary ranges like the american Omaha and Phoenix, whilst having a decent amount of fast firing guns to make a difference when it matters. Be cautious of your slower reaction/rudder shift time when facing of against other like tiered cruisers and start to learn and work the Japanese style of play to your advantage. These traits are only accentuated more in the T5 Furutaka Cruiser (bigger guns, bigger torps, bigger fun =D) so the Kuma is a solid ship to find out if the Jap style of play is for you.
The Furutaka T5 Jap Cruiser
Thanks for reading and I hope to see you back here soon.
I thought I would give a quick update of where I am at with my Tiger. I've been concentrating on the little details that really start to pull this commanders cupola together and bring it to a close. I want to get this done in the next week as I have been spending a little too much time playing World of Warships. This is good for you meaning if your interested in this as I can give better ship reviews and work towards them all important higher tiered ships. I'm sure you all have your eyes set on particular ships that you will like to get if your waiting for access to the Closed beta. I am currently at tier 7 in the Japs destroyer line with my Hatsuharu ship.
Not my port but same pretty ship!
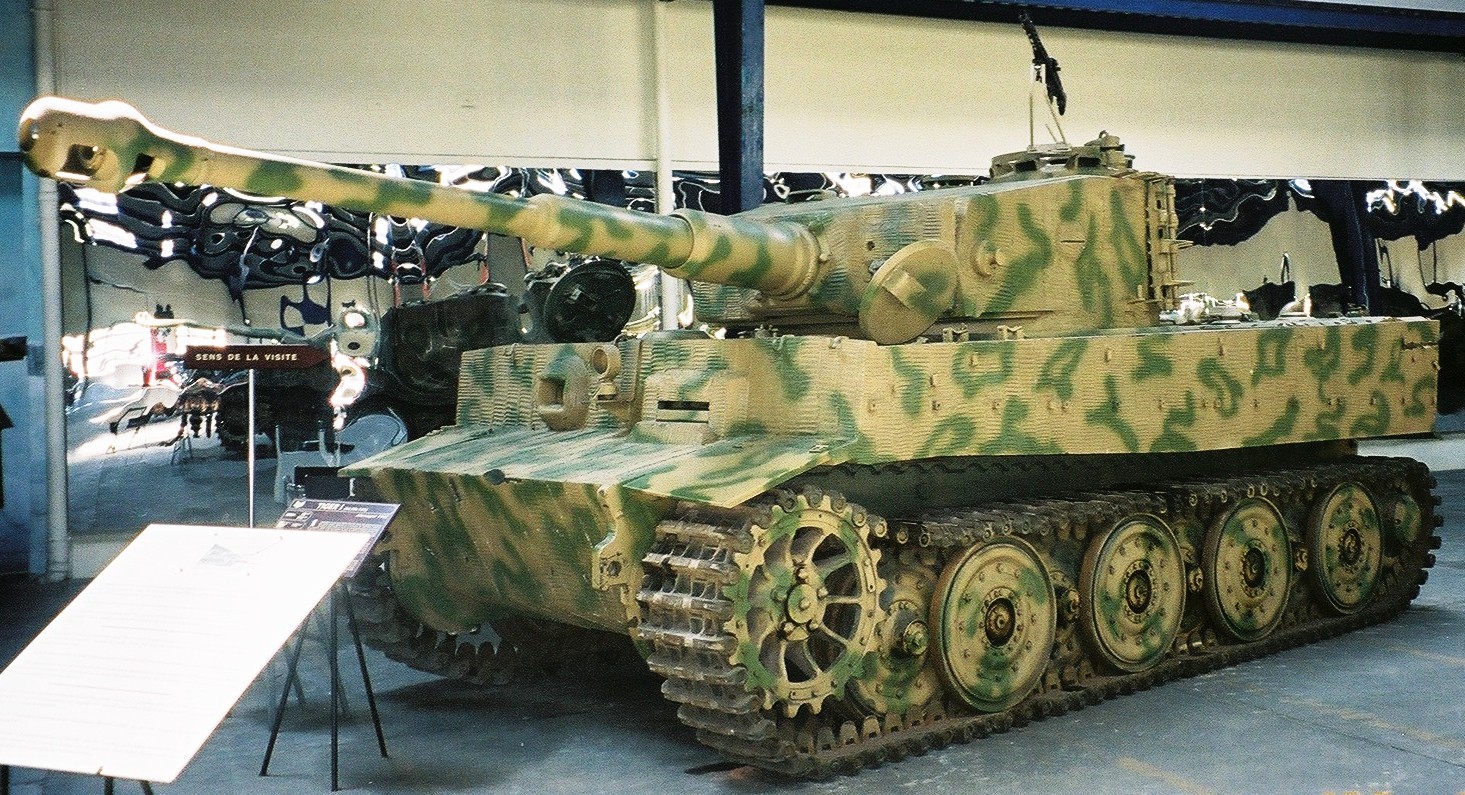
I have been looking for some decent reference imagery of this spring loaded hinge that aids the commander to open his hatch. Unfortunately I have been pretty unlucky with my efforts so from the images that I have been able to find I have had to still do some significant guess work with how this part works (if anyone has any decent close up pictures of this part from the 131 Tiger at Bovington Tank Museum it would be much appreciated) .
Any detail shots of this would be appreciated.
Here is my modelling work in progress with my early Tiger tank commanders cupola.Take care and have a good weekend and I look forward to seeing you back here at a later date to see my progress
Welcome Back,
For all you hard working 3D Artists this is a post you should definitely read. I thought I would write about a 3D model Previewer I am thinking about using to display my models on here in the future. Its pretty good not only for you to look around my models I am doing to see how its been done, but also enable you get up close and personal at all the detail from different angles than just a single photo. For me this means I will have to be more diligent as all the mistakes people may not be able to see will now be viable to anyone with a keen eye =D.
Wargaming seems to uses this site for proving their models for the game engine. Its also a place where fans can view their hard work up close and see the beauty's they are grinding for. To keep it short I am going to embed some of their newest models for you to view and have a play with and will use this where possible to show you my updates of my Tiger model.
For those of you that play world of tanks regularly you will instantly recognise these tanks. some being apart of the Berlin trio and others being higher tier tanks. These 3d models should give you an idea of how much hard work goes into each of these tanks. With Wargaming making HD models for its tanks with PBR textures, these are representative of their current and upcoming standard they are aiming for with in game models.
Though I would give you a update on how I have been progressing on my Tiger Tank. With this week being bank holiday Monday in the UK (Over which I went to a music festival Dot to Dot Nottingham and saw lots of great bands such as Amber Run and Saint Raymond) I've only managed to fit in a little bit of modelling but now the Cupola is really starting to take form with those extra detail that really polish a model. .
This week I looked at modelling the hinge system that connects the hatch to the drum cupola. The hinge works on a 3 piece system with 2 hinges and a link to help close the lid on this great beast. The main Hinge seats underneath what looks like a spring system that would help the commander lift the hatch of his cupola. as the lid was 15mm thick it mush have been fairly heavy. The hatch diameter was 420mm lined with a thick rubber seal to prevent water form entering in deep wading and heavy weather conditions.
Tiger Drum Cupola
The hinge in itself seemed pretty complex for its purpose but the Tiger in general was notorious for being ridiculously over engineered. In WW2 to consider which nation had the least fuel and metal to come up with an idea for a fuel munching metal beast like the Tiger tank was almost insane.
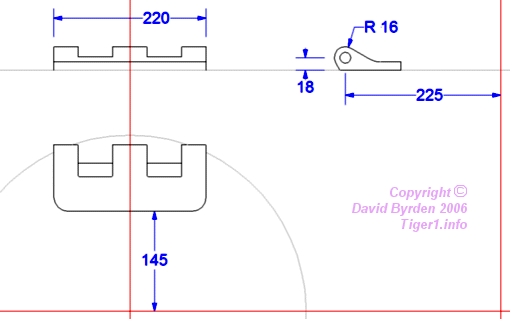
Hinge Technical Drawings
Above is the technical drawings of the commanders hatch lid hinge. I noticed that the fall off curvature from the hinge wasn't quite right in comparison to what is shown from Pictures taken of Tiger 131 in the Bovington Tank Museum. I altered my model whilst using the measurements given to more accurately depict the hinge.
Hinge Wireframe
Hinge Turbo Smoothed
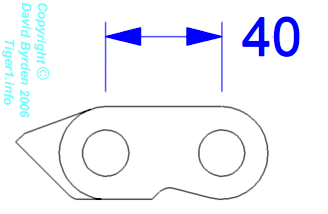
The eyelet that connects the two Hinges looks almost like a bike chain with a little extra to help the lid rest in a stable position when opened.
Eyelet Link technical Drawing
Wireframe of Link
Turbo Smoothed Link
The final bit of the hinge is now the bit that is connected to the drum itself. its more or less the mirror of the first hinge I made but with a few different features.
Second Hinge Technical Drawing
Wireframe of Second Hinge
Turbo Smoothed Second Hinge
So the top of the Cupola is starting to take shape now, I have a few more things to do then I can add the 18 degree offset to the top details. Its just easier to keep things this way until the end as any 3D person will know.
Progress So Far =)
What the Top of the Cupola Will Look like with the 18 Degee Offset
That's all for this week, I hope to catch you back here soon. Till then take care and have fun playing what every you play. Before I go I would like to thank the Tiger website I have been using for all your technical drawings. You have been a great resource. Find the link to it here
I did plan to get this post out over the weekend but as things fate conspired against me (i.e. a USB stick had a untimely death when going back to a family event) so I will get this post out as part of my first double post this week. This is just a quick update on How I have been getting on with my Tiger tank and a little sneak preview of my working process.
After doing a bit of searching about the look of the Tigers there are 2 distinct types of cupola. The earlier drum cupola mounted in earlier versions gave the commander a higher point of view when viewing the battle field but left his head quite exposed. For those of you that play world of tanks you will be used to seeing the later style turret on the Tiger though I'm not quite sure where the first turret that tiger uses comes from as I have seen no imagery of that style of turret been fitted to a tiger (anyone fancy giving a comment on that would be interesting)
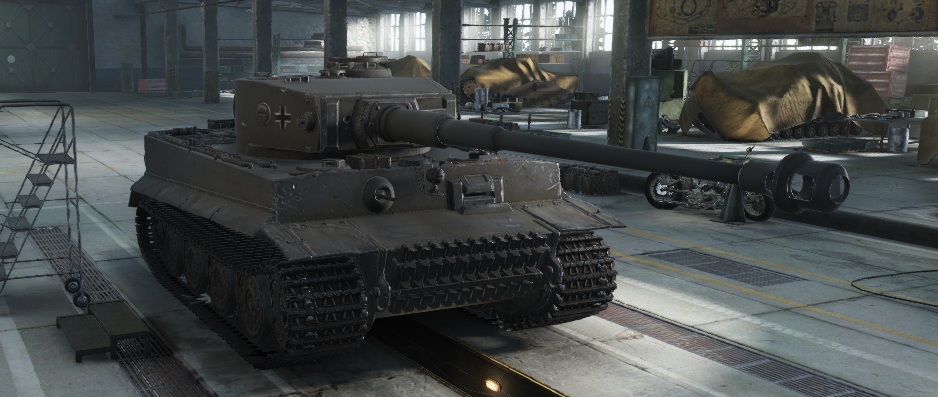
The asymmetric turret everyone recognises with the Tiger Tank
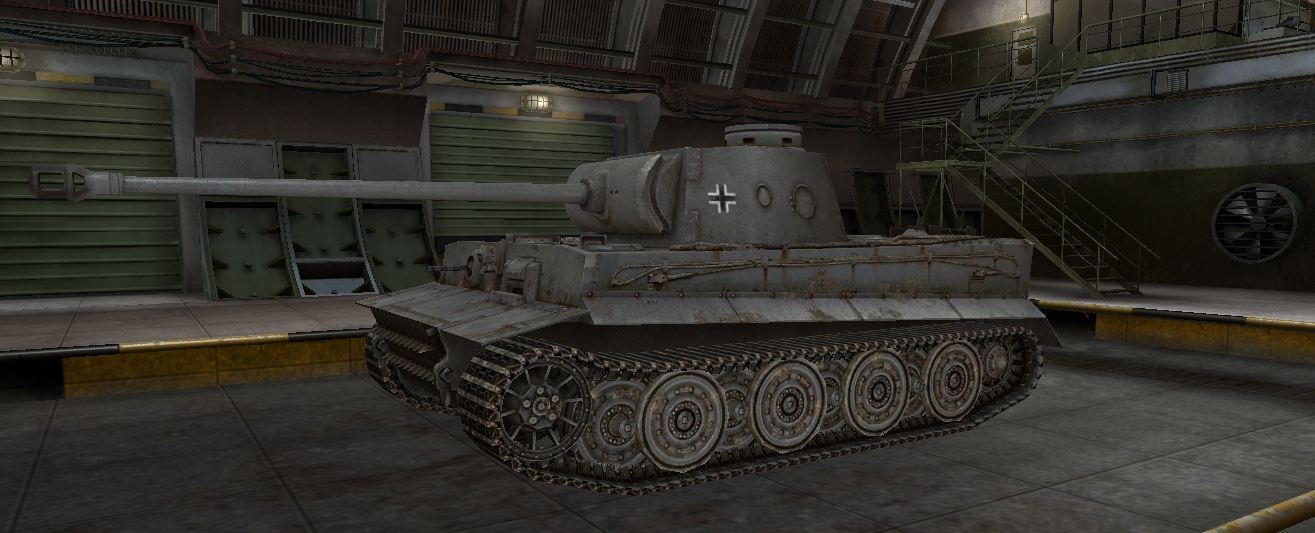
What is this turret? Stock turret in WoT but when was this used?
When most of the tank from the front had 100mm of armour, which on a ideal engagement would be facing the enemy at a 45 degree angle, made the effective armour around 140mm ish thick (without the proper maths done). A direct shot to the commanders cupola assuming the shot hits on a dime, is only 75mm. Though hitting a drum design exactly at perpendicular angle is pretty hard to go when engagements for tigers were mostly at long range.
Older Drum Design Cupola
Later Tigers incorporated a flatter design which was adopted onto the kind tiger and a similar variety onto the Panther. This cupola design saved on materials needed to build it as well as reduced the vulnerability of the commanders head to fire.
Later variant of Tiger shown by the later varient of cupola, road wheels and gun mantlet
Building the Tigers early cupola really highlights how complex the tank was in comparison to Russian and American tanks. Designed for deep wading up to 4 meters the tank had to have drainage holes cur into areas which water would collate. The 10 round holes cut into he top of the cupola allowed water to drain off from the cupola lid whilst having a 18 degrees offset so the water did not run off directly into the vision slits lower down (very early editions of this cupola had drainage holes above the view ports before this error was noted).
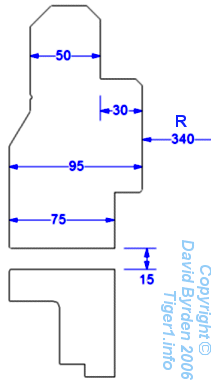
The thickness of the armour variates throughout the drums total structure but on the whole it maintained a 75mm thickness along the main body that covered the commanders head.
Cut through of thickness for tigers Drum Cupola
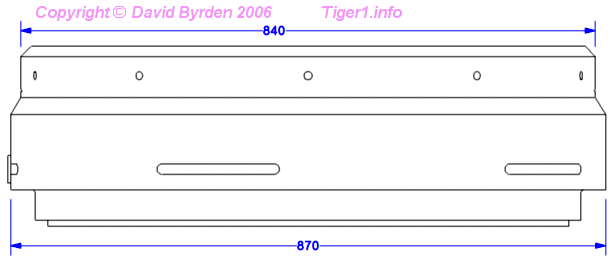
The Diameter slightly as well as shown in the image below.
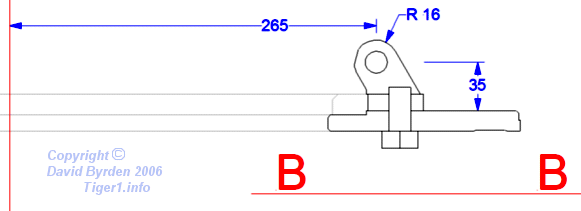
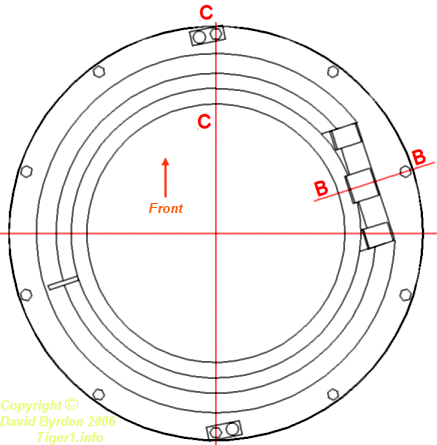
Diameter of different parts of the Cupola
All these reference images for sizes and positions are from www.Tiger1.info which has been a amazing site for technical information throughout this project so far so I can't recommend it enough.
Doing 3D meshes with cuts in always presents a challenge of how best to position your geometry to best get what you are trying to achieve whilst keeping your mesh tidy. This is again harder in cylinders as securing lines in the wrong areas cause pinching. Without creating my own tutorial which would be pointless there is loads of tutorials out there on youtube and this in particular tutorial shows exactly how I structure my geometry when I created my Cupola.
I went one step further than this guy however by figuring out the maths about where I could place my cuts along the Circumference of the cylinder to get the geometry to seat in the exact positions I wanted them too. In short I figured out the circumference, (because I knew the Diameter I could figure out the circumference which is C=πd) then set out cylinders with the exact lengths (for the view port slits in the cupola) and diameter (for the drainage holes) then bent the boolean'd mesh around a central point to create a cylinder. This may be hard to visualise in your head so ill put some pictures below.
Doing this method should in theory place the cuts from the boolean in the exact place they should be if its a perfect circle.
After a little bit more work that what I have shown you here this is where I am with the Cupola. I still have more work to go with it like creating the welds for where it connects to the turret and the hinge to model but I'm fairly pleased with the result. The cylinder still has a little bit of pinching but its pretty negligible
The Un-Subdivided Wireframe Mesh
The Smoothed Mesh (turbo smoothed)
Smoothed Non Wireframe Result WIP
This is where I am so far, working full time means little time for me to do my own work but its important that I keep it up share and review it for my own self progression. Thats all for now, I hope you've enjoyed this little snippet of my work and keep looking back as I battle my way through this bad boy to create a banging looking Tiger tank.